


IMPORTANT INFORMATION
This step by step guide covers the basics of a power flush. For advice on specific problems or situations refer to the POWER FLUSHING SUPPORT section of our web site, or call Kamco on 01727 875020. 1 WHAT'S IN THE BOX
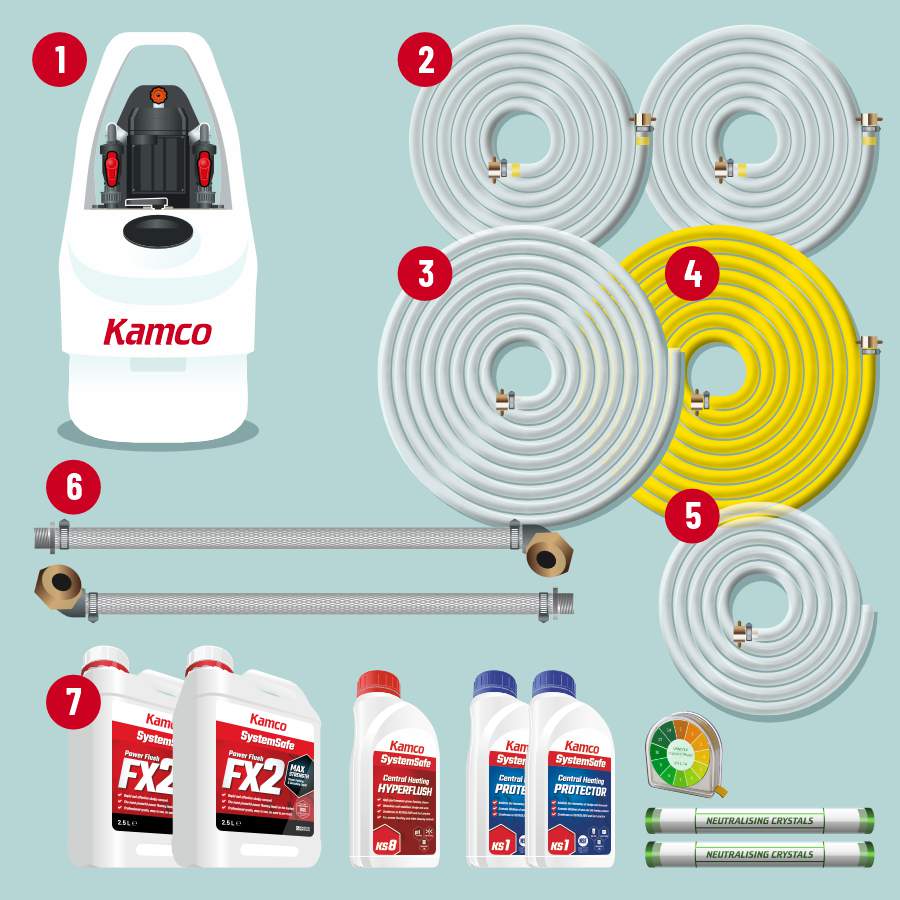
- 1. CLEARFLOW PUMP
- 2. FLOW AND RETURN HOSE (2x 5m)
- 3. DUMP HOSE (8m)
- 4. WATER INLET HOSE (8m)
- 5. OVERFLOW HOSE (3m)
- 6. CIRCULATOR PUMP ADAPTER HOSES
- 7. KAMCO CHEMICAL STARTER PACK Also included: BSP Adapters (10 pack)
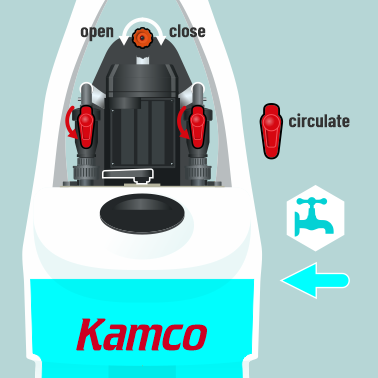
2 VALVES AND FLOW REVERSER
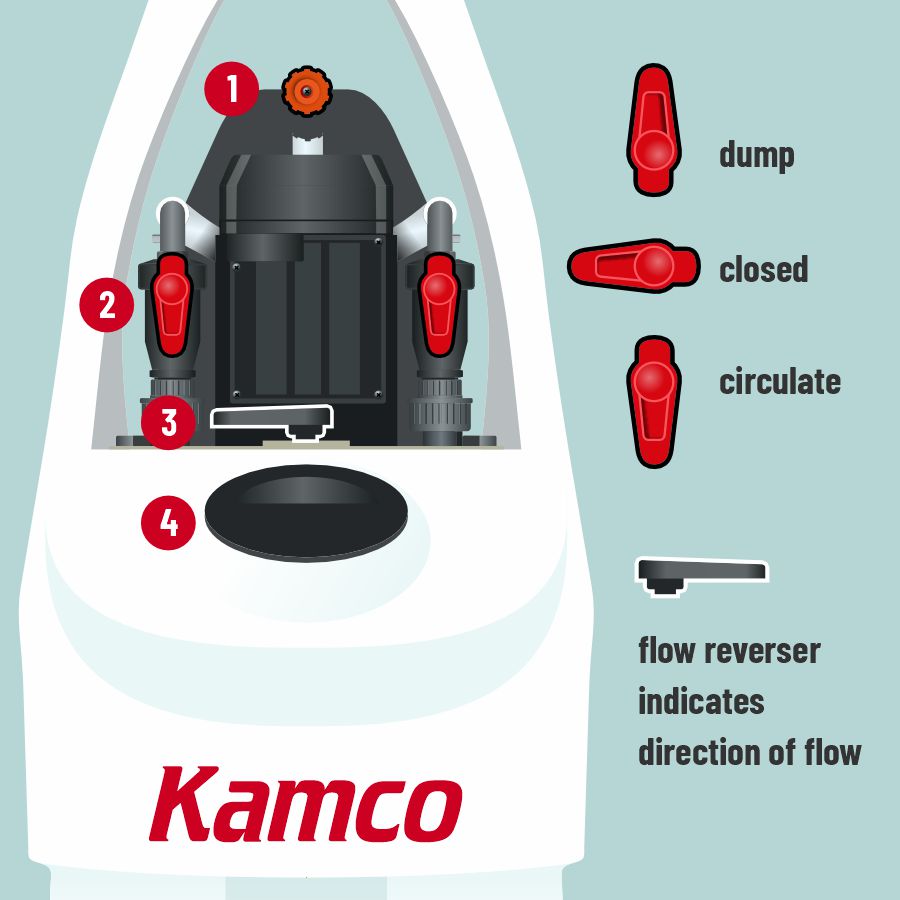
- 1. WATER INLET VALVE
(location may vary) - 2. ISOLATION VALVES (2x)
- 3. FLOW REVERSER LEVER
- 4. HOLDING TANK ACCESS CAP
3 LOCATING THE CLEARFLOW PUMP
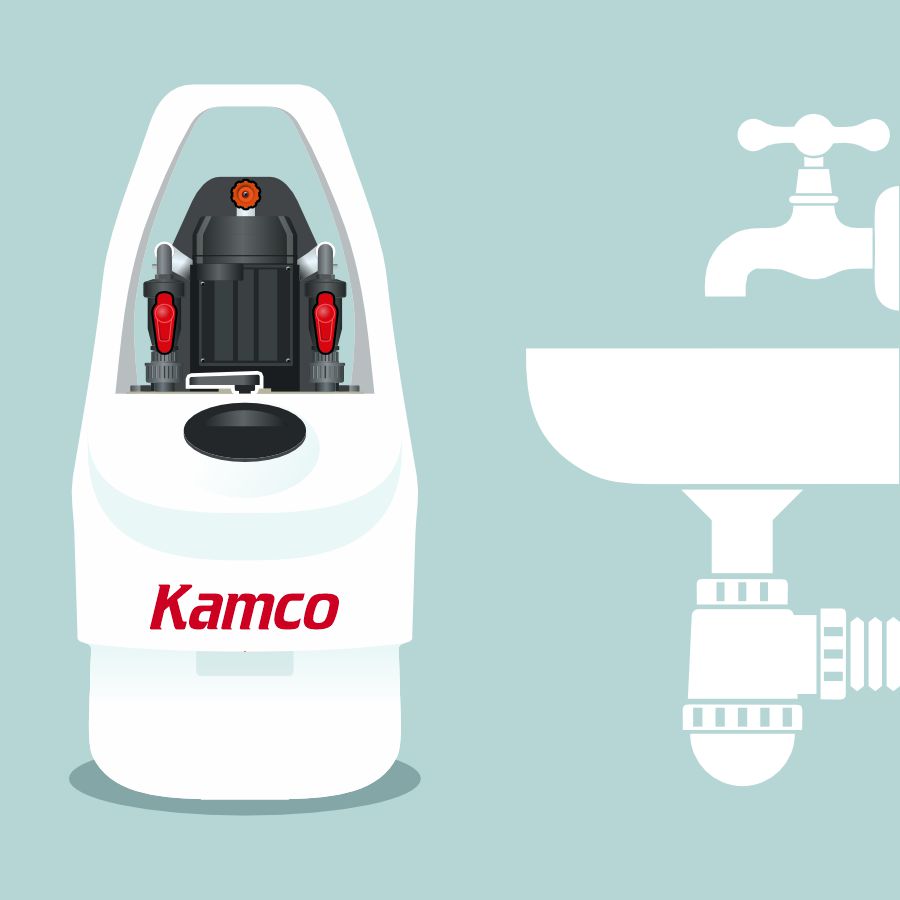
- Locate close to supply of mains water
- Locate close to foul water waste drain
4 CONNECTING HOSES TO PUMP
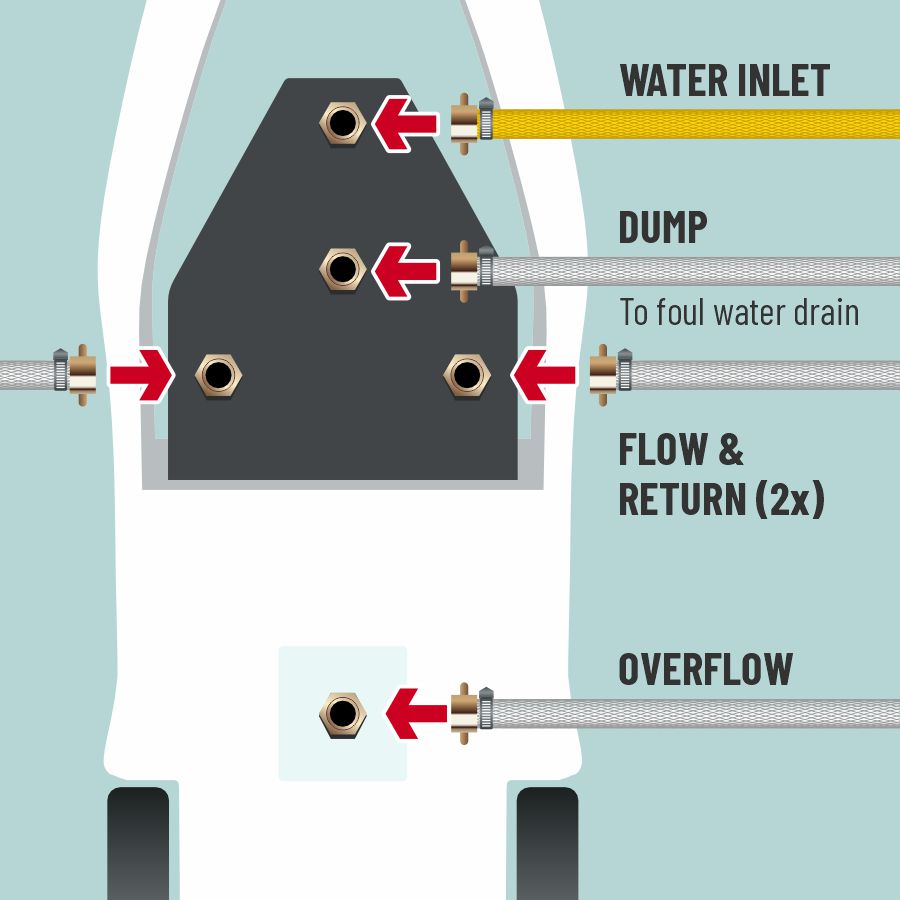
- Connect hoses firmly by hand
5 SEAL OFF VENTED SYSTEMS
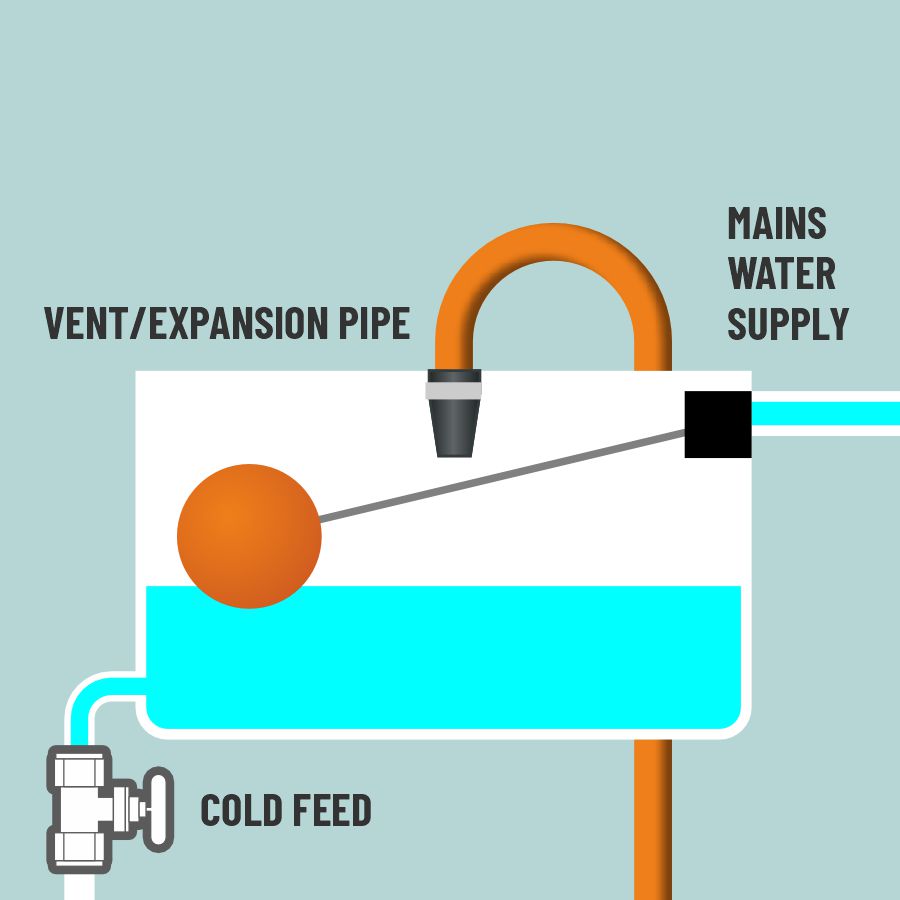
- Isolate mains water supply
- Isolate cold feed
- Fit temporary cap to expansion/vent pipe
6 ADJUST THERMOSTATIC VALVES
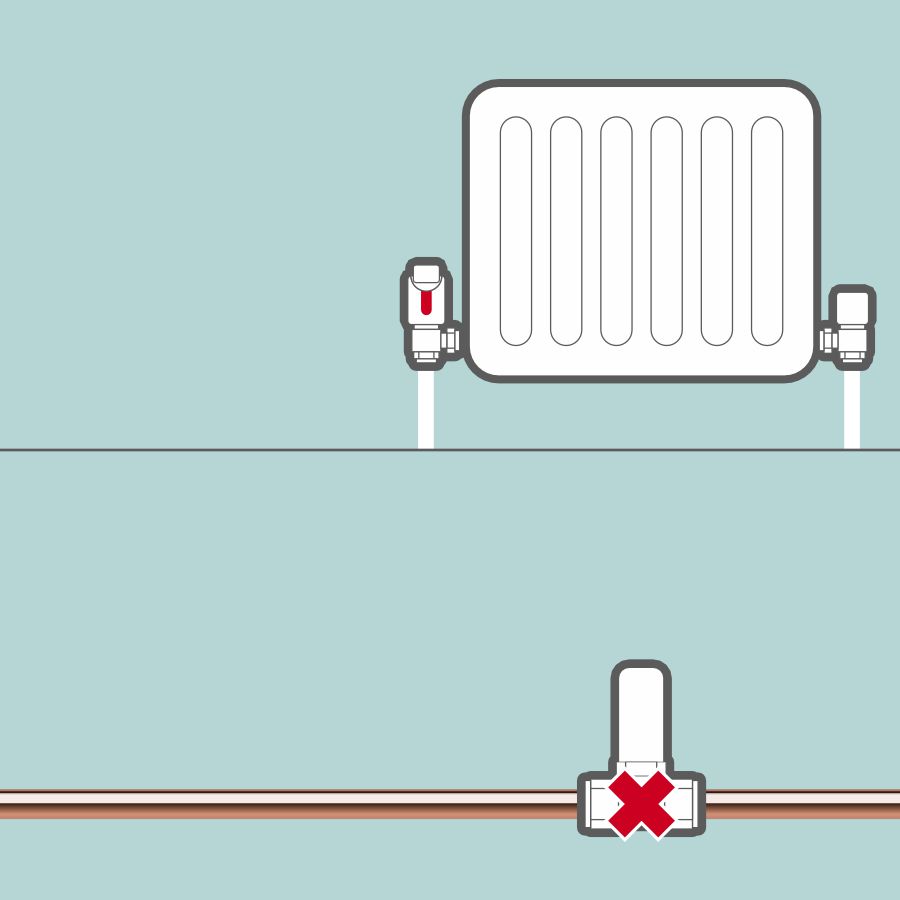
- Set thermostatic radiator valves to maximum
- Remove thermostatic valve heads
- Close by-pass
- Close auto by-pass (if present )
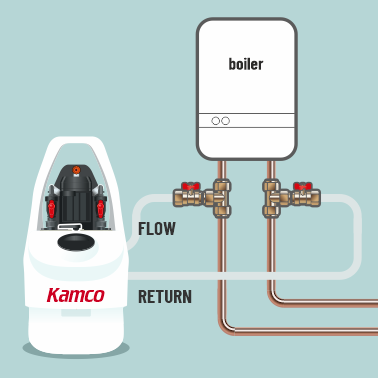
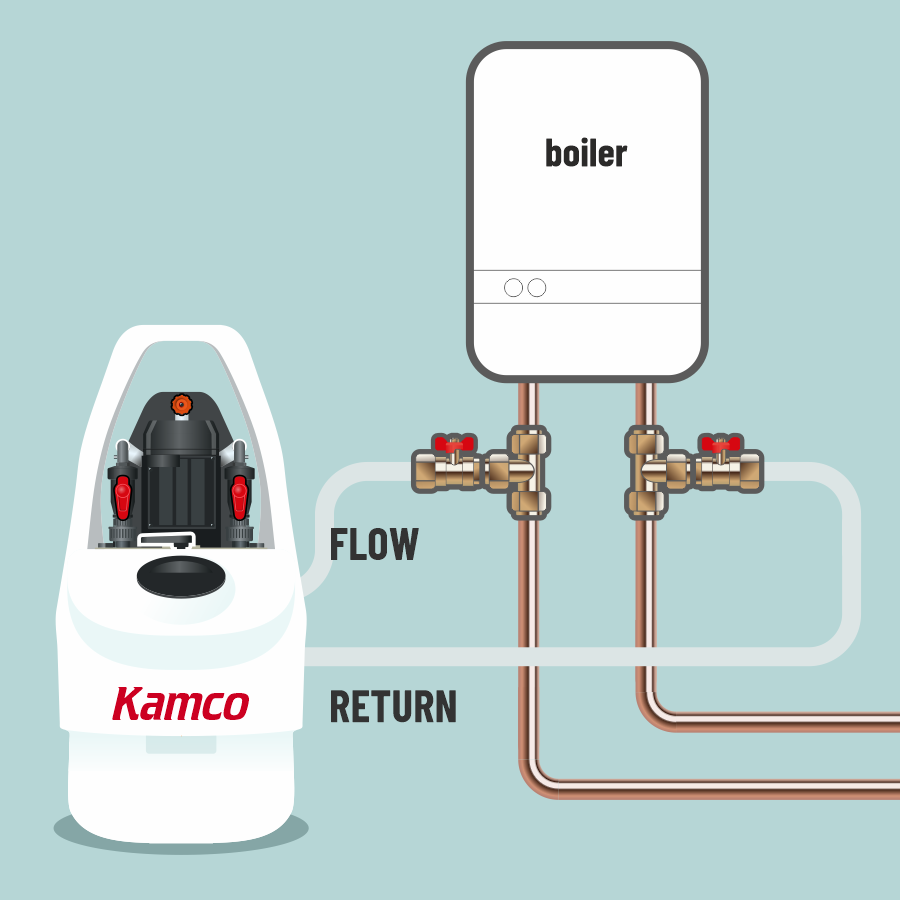
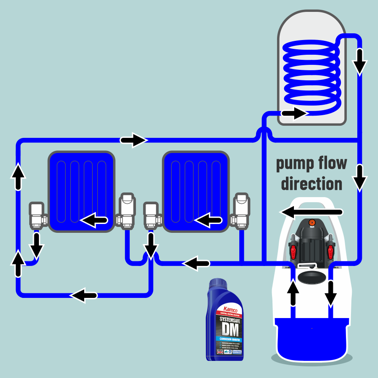
7 METHODS FOR CONNECTION
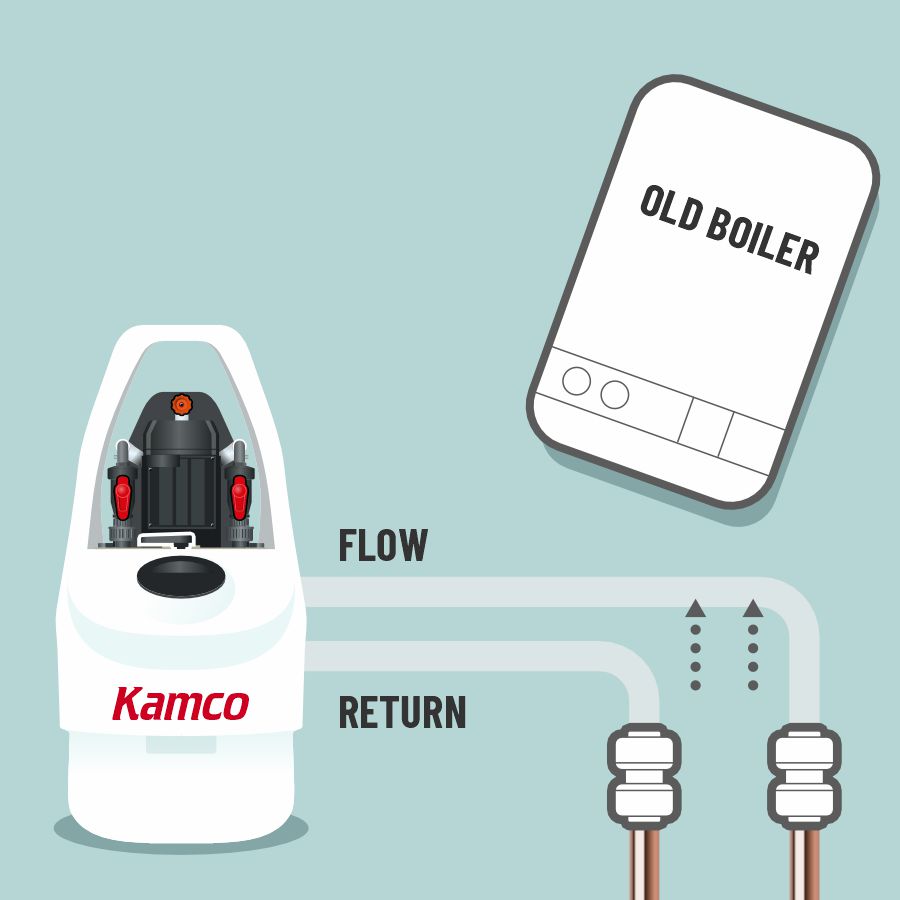
- Connect across flow and return pipes
after boiler has been removed
REPLACING THE BOILER
8 METHODS FOR CONNECTION
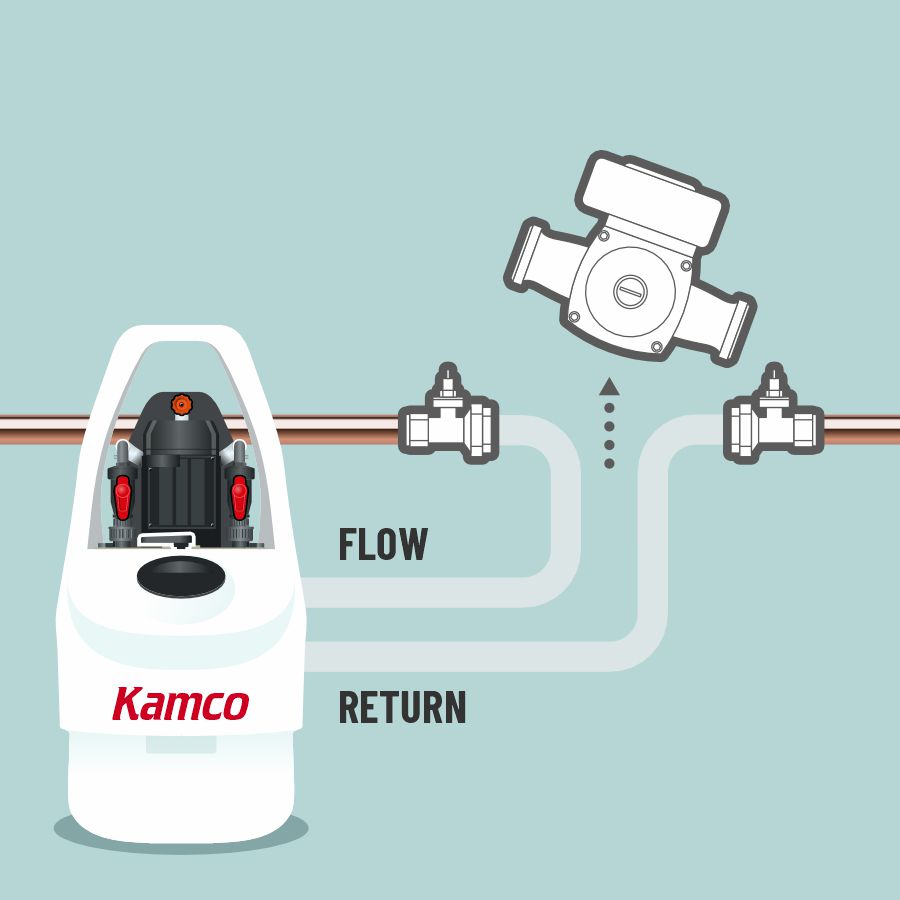
- Connect to circulator pump connections using adapter hoses supplied
REMOVE CIRCULATOR PUMP
9 METHODS FOR CONNECTION
- Remove circulator pump head only
- Connect CP2 or circulator pump body
- Connect Clearflow Pump with hoses
supplied with CP2
CP2 CIRCULATOR PUMP ADAPTER
10 METHODS FOR CONNECTION
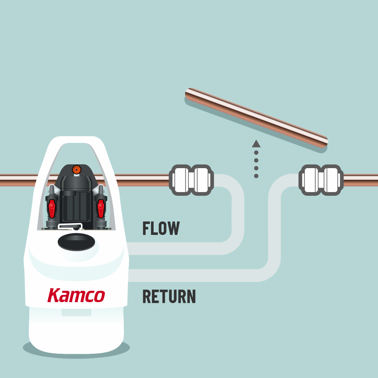

- Remove a section of copper pipe
- Connect with push fit connectors
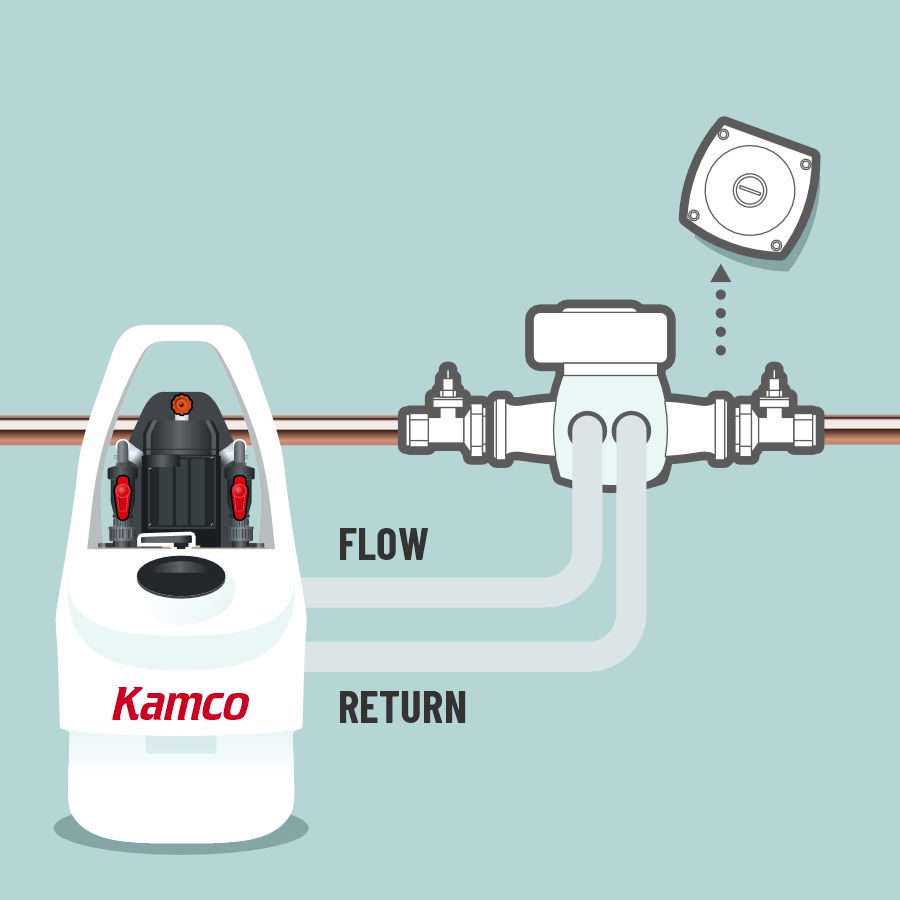
BREAK INTO COPPER PIPE
11 METHODS FOR CONNECTION

- Connect Clearflow to radiator valve bodies
(not suitable for microbore systems)
REMOVE A RADIATOR
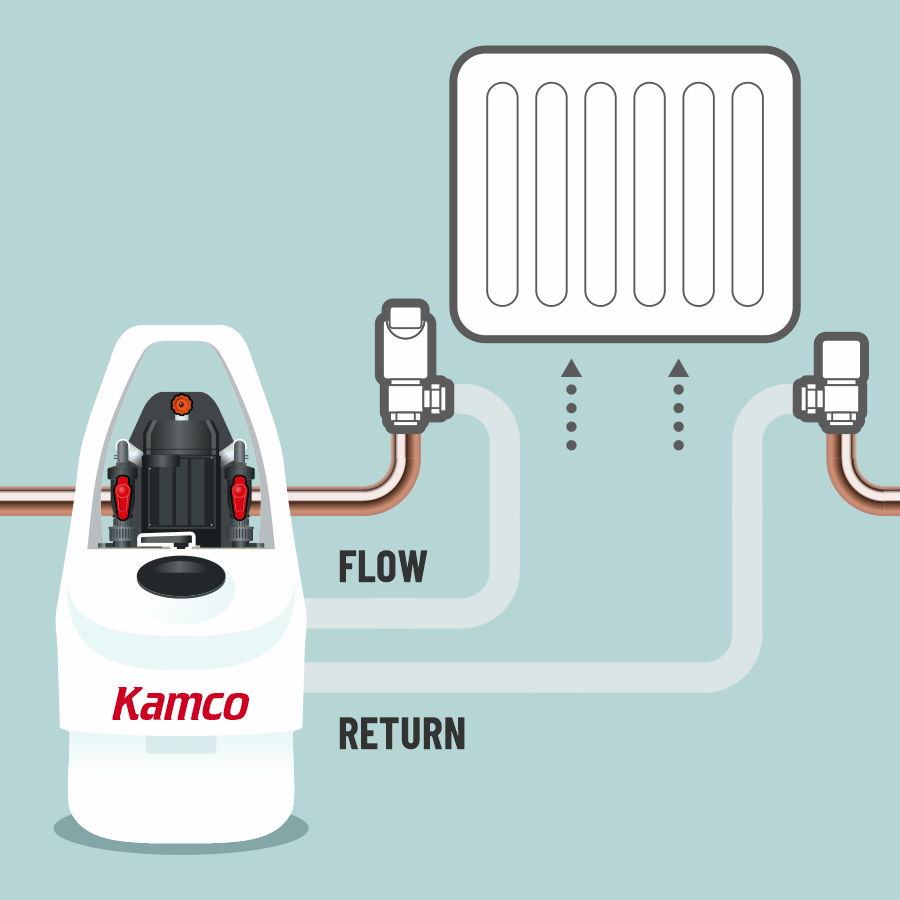
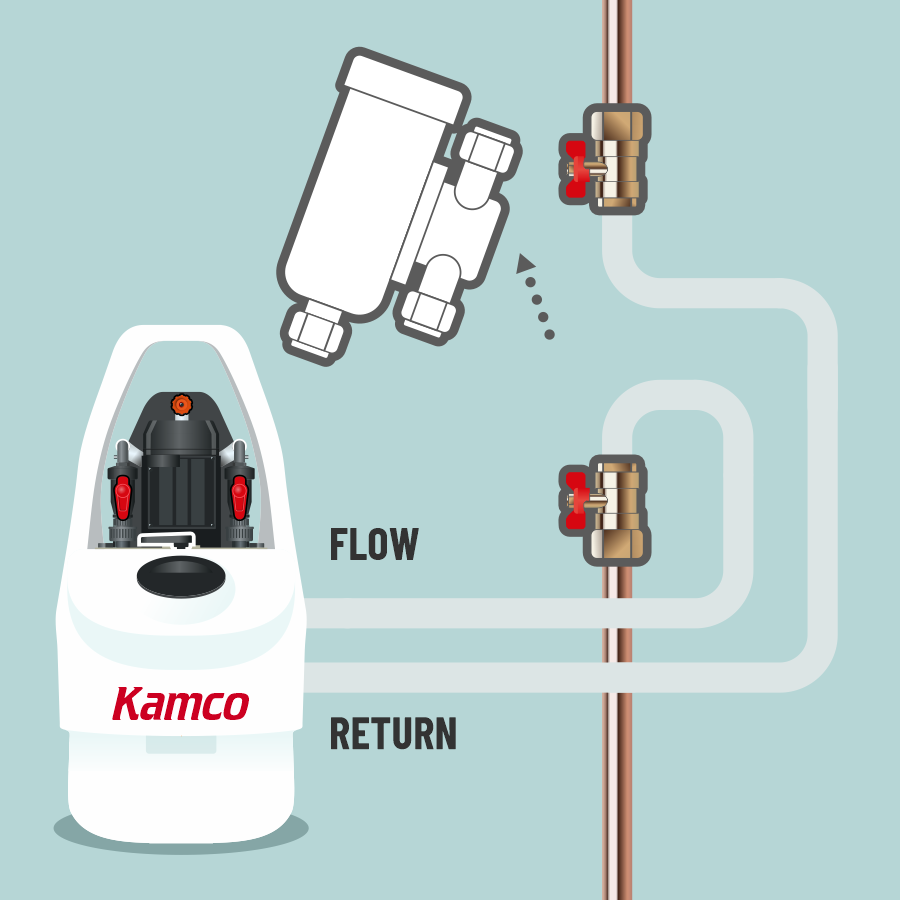
12 METHODS FOR CONNECTION
- Tees and valves may be fitted to boiler tails for convenient connection in the future
CONNECT TO BOILER TAILS
13 METHODS FOR CONNECTION

- Connect to pipework/isolation valves after removal of filter
REMOVE MAGNETIC FILTER
14 FASTER POWER FLUSHING
- Quickly captures magnetic debris
- Speeds up flushing process
- Reduces water usage
- Customers can see what WAS in their system
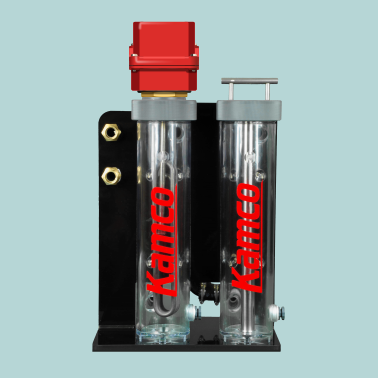
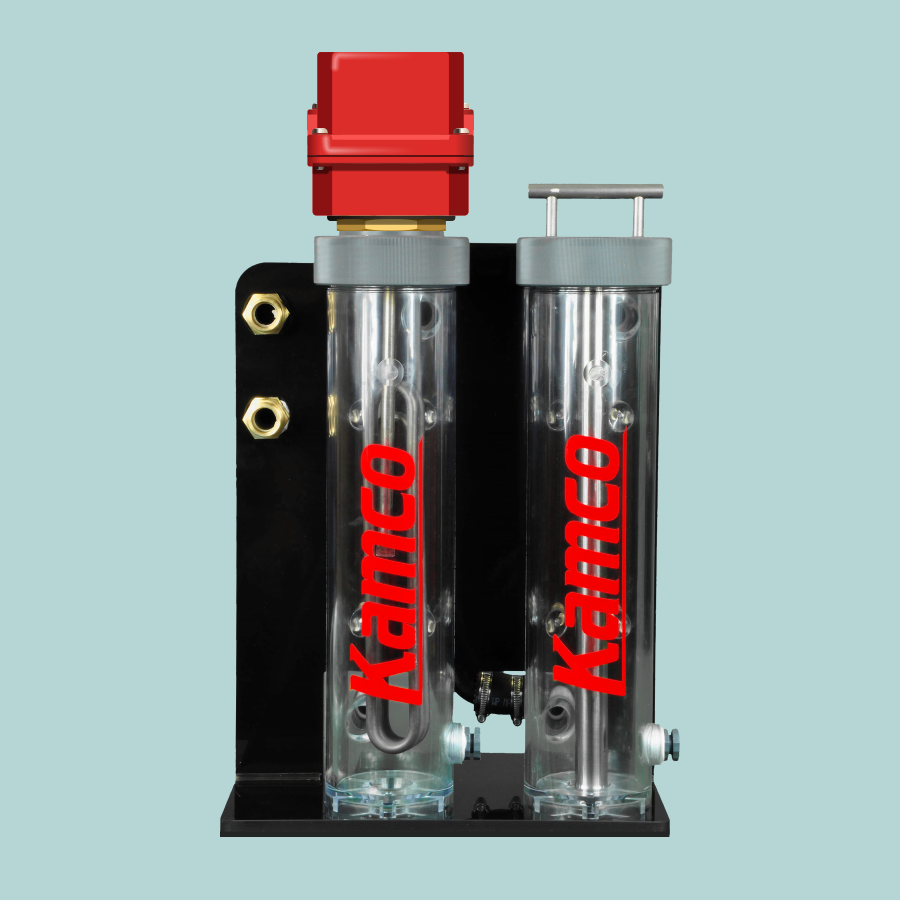
Kamco CombiMAG
15 CONNECTING CombiMAG
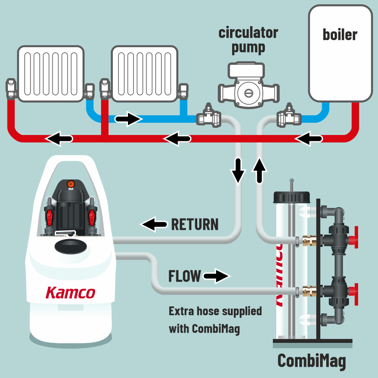

- Connect CombiMAG to system using
hoses and adapters supplied
with CombiMAG - CombiMAG may be connected along side Clearflow in a variety of locations
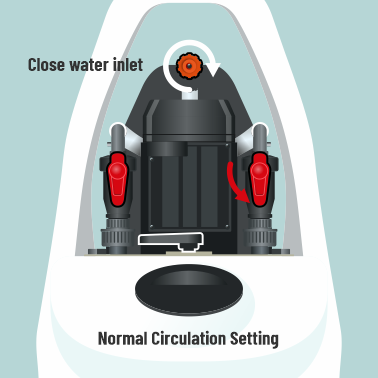
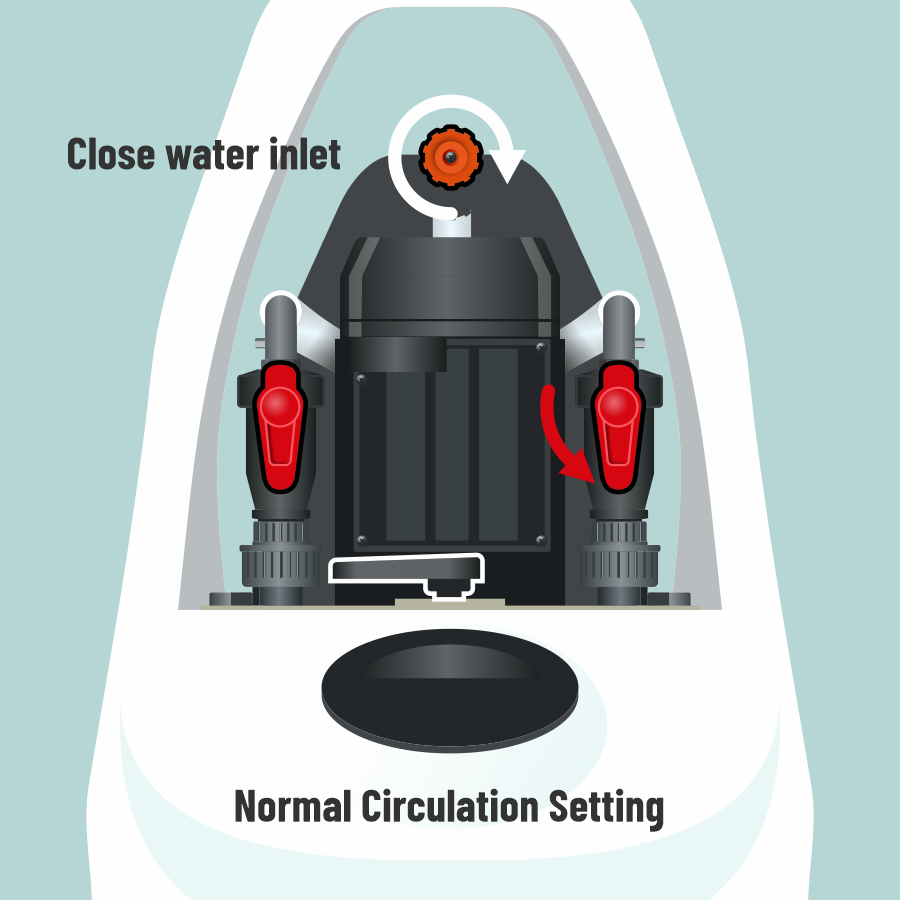
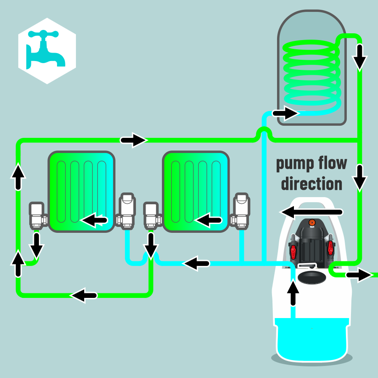
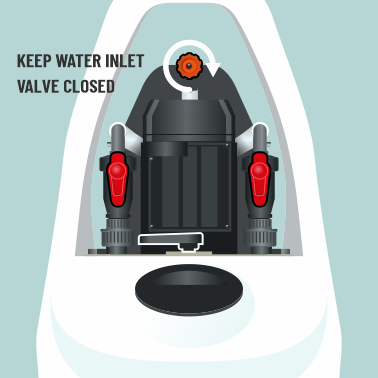
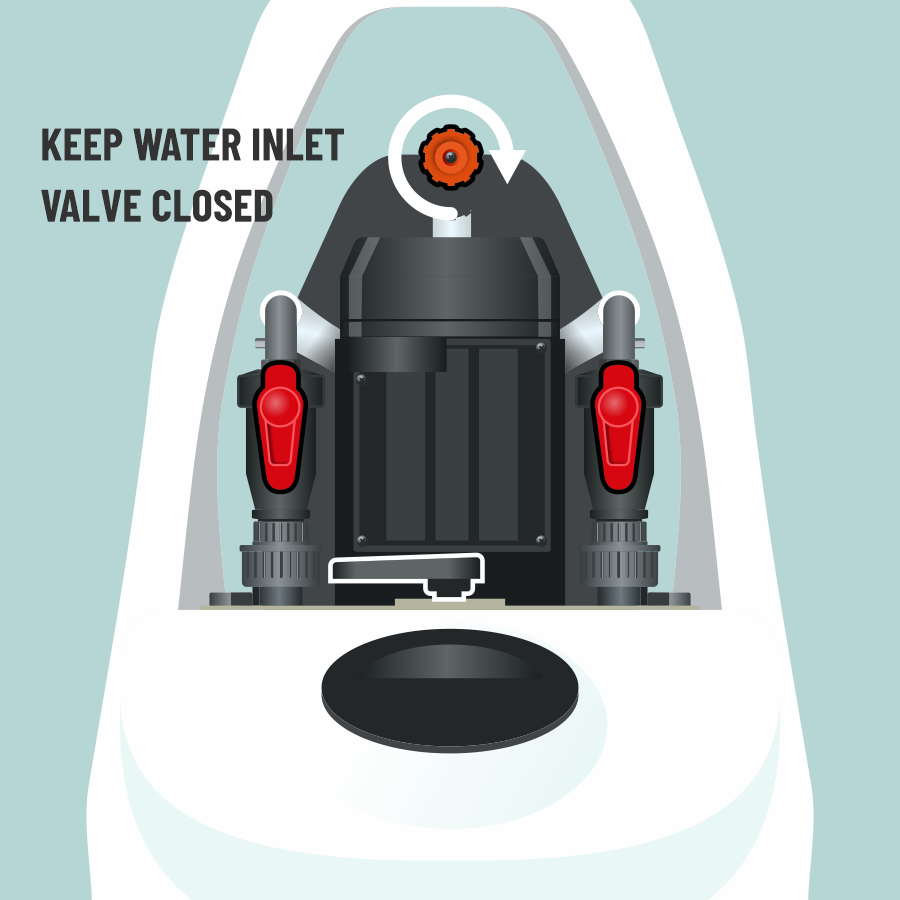
16 PREPARE CLEARFLOW PUMP

- Open water inlet valve
- Allow holding tank to fill to half way
- Close water inlet valve
- Set both isolation valves to downward "circulate" position
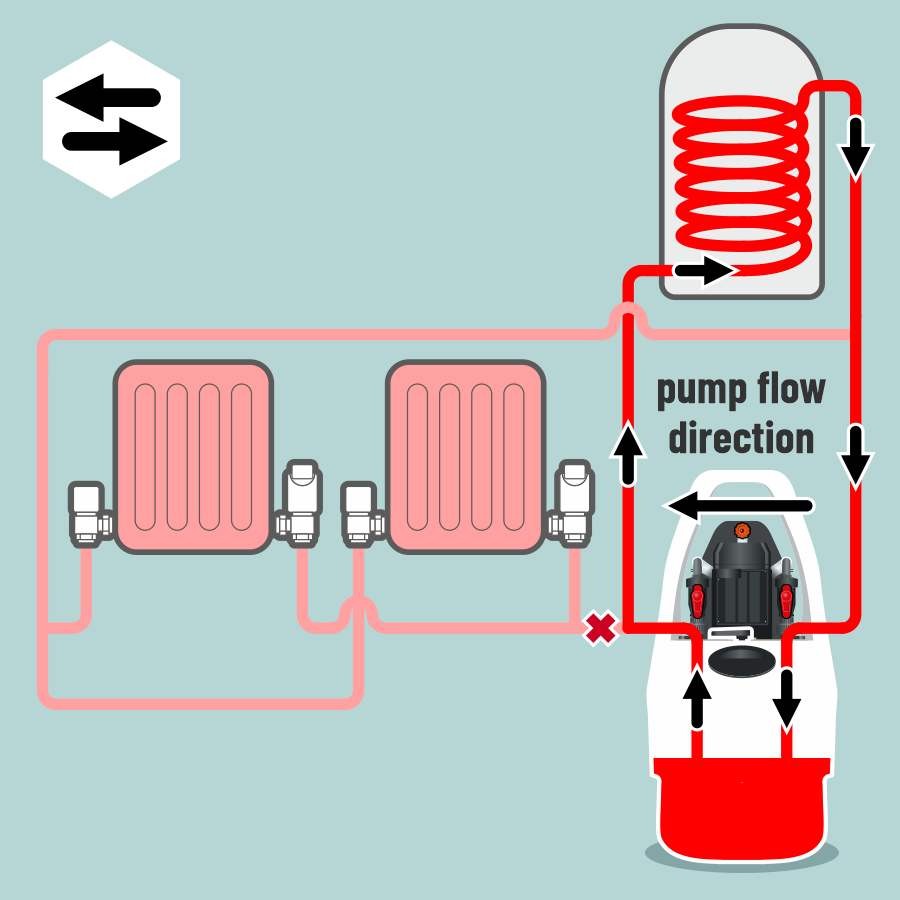
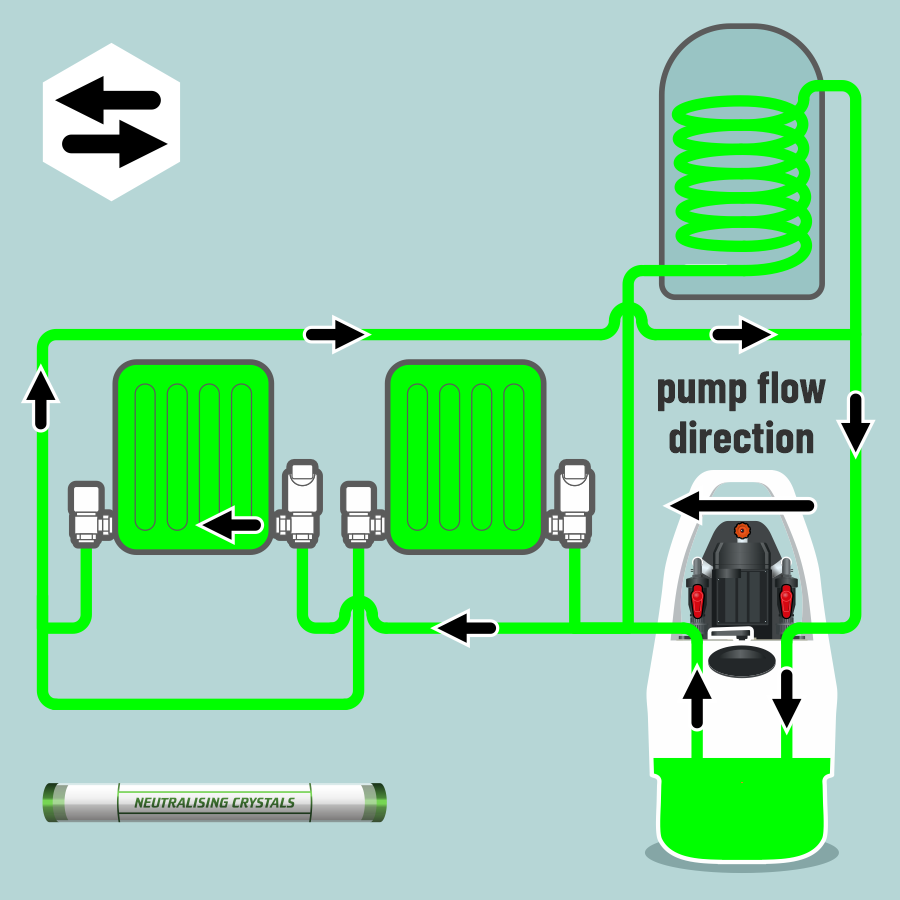
17 POWER FLUSHING BEGINS
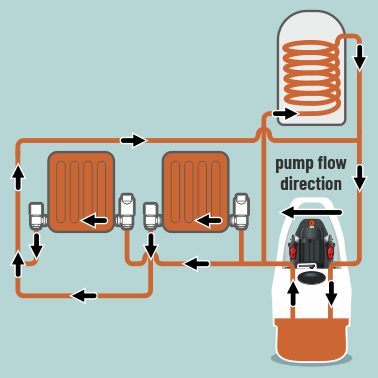

- System is wide open
- Activate main power switch on top of the motor housing
18 REVERSE DIRECTION OF FLOW

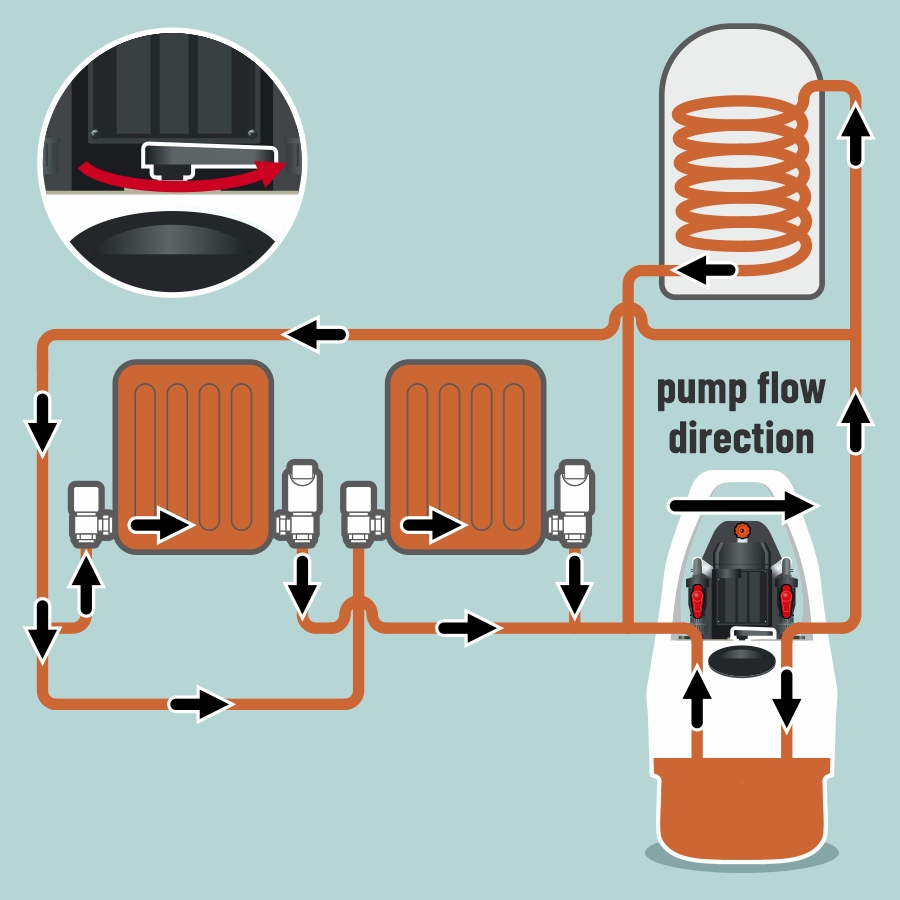
- Rotate flow reversal lever through 90°
from left to right - System is wide open.
19 SET VALVES TO DUMP


- Isolation valve to the opposite side of flow direction is set upwards to "dump"
- Water inlet valve is balanced to maintain water level in the holding tank
20 DUMP RADIATORS & CYLINDER*

- System is wide open
- Dump to foul water waste drain *If cylinder is present
21 DUMP UNTIL WATER CLEARS

- System is wide open
22 SET VALVES TO CIRCULATE


- Ensure water inlet valve is closed
- Reset isolation valve to downward position
23 ADD POWER FLUSH FX2
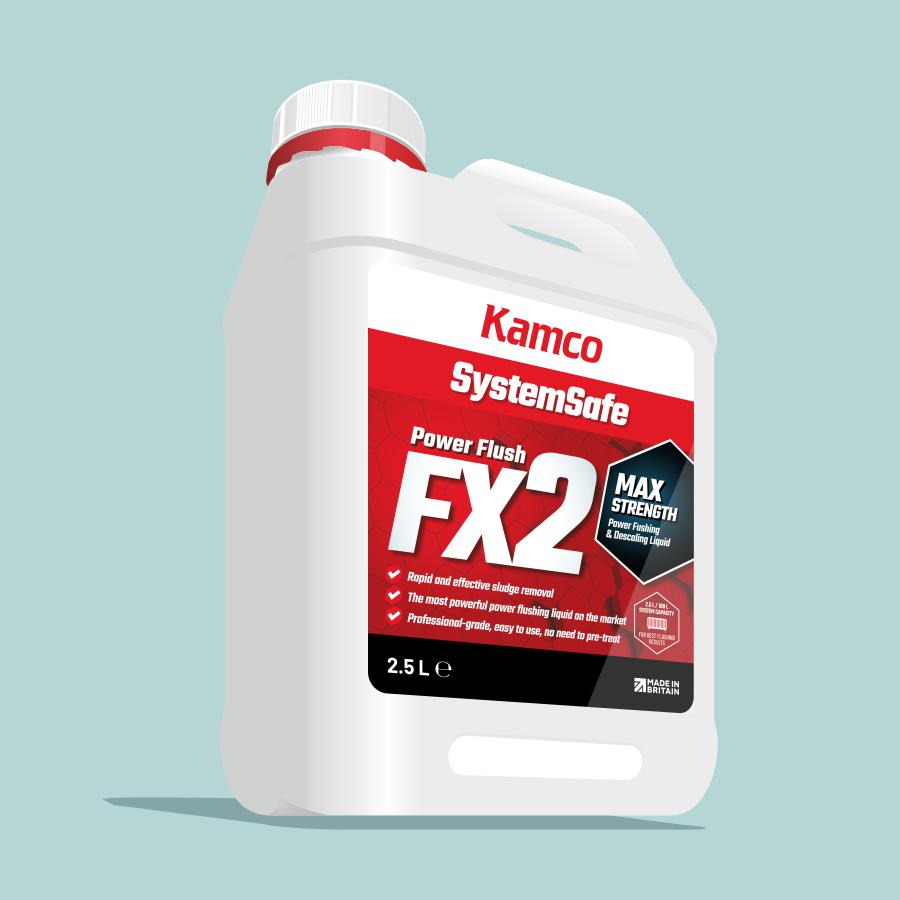
- KAMCO recommends Power Flush FX2
- Max power, no need to pre-treat
- Add FX2 to holding tank via access cap
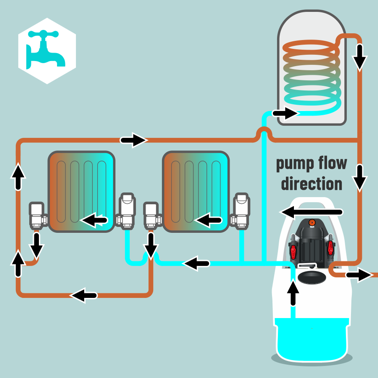
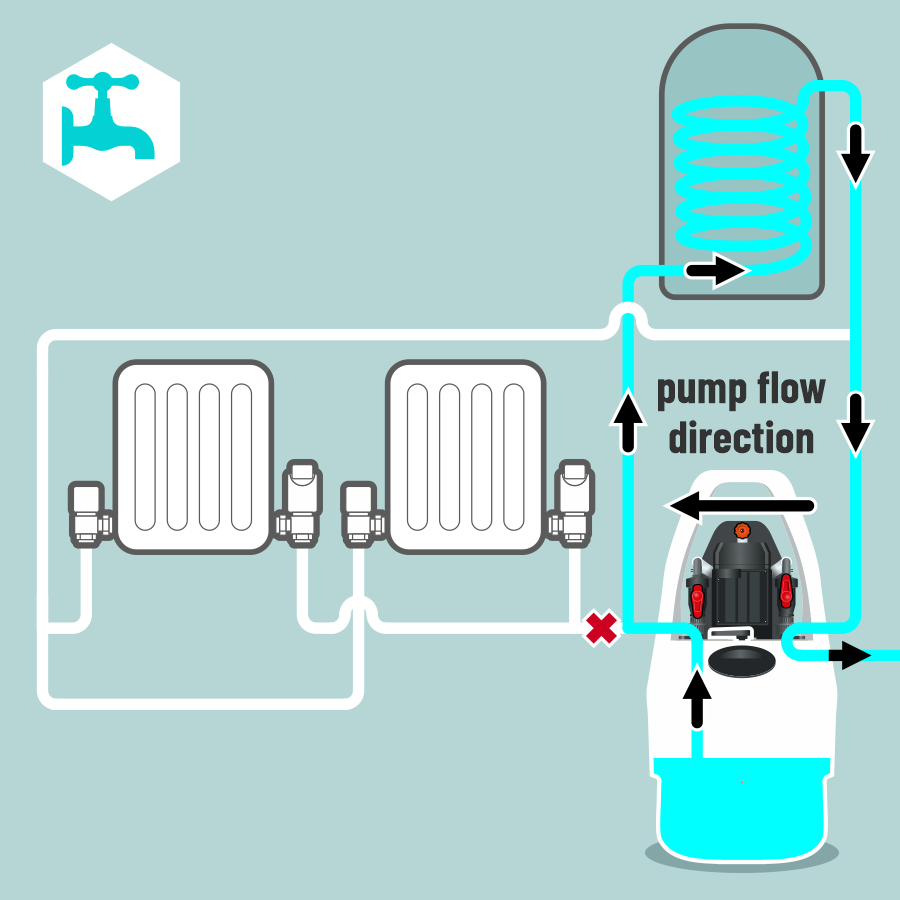
24 CIRCULATE FX2
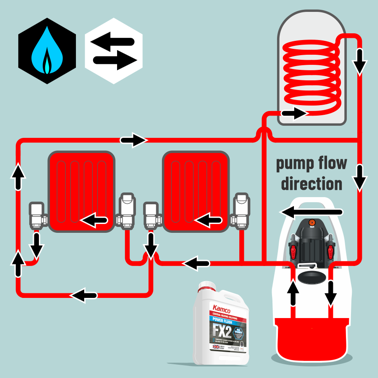

- Circulate FX2 throughout system
- Turn on boiler, heat system to 50°C
- Turn off boiler
- Reverse flow regularly
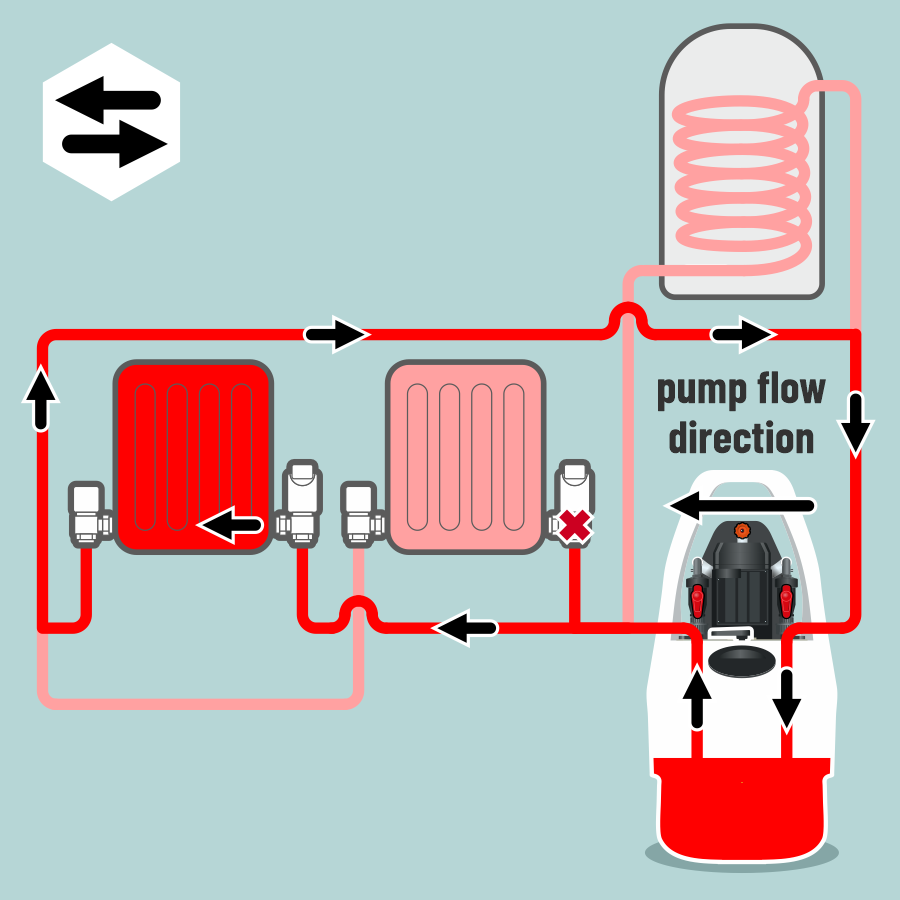
25 ISOLATE RADIATORS
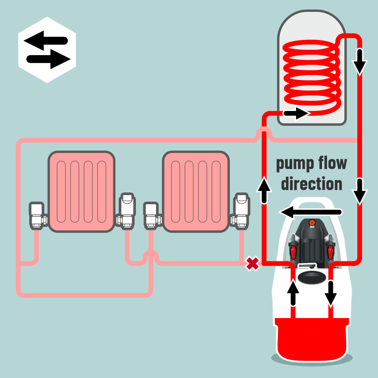
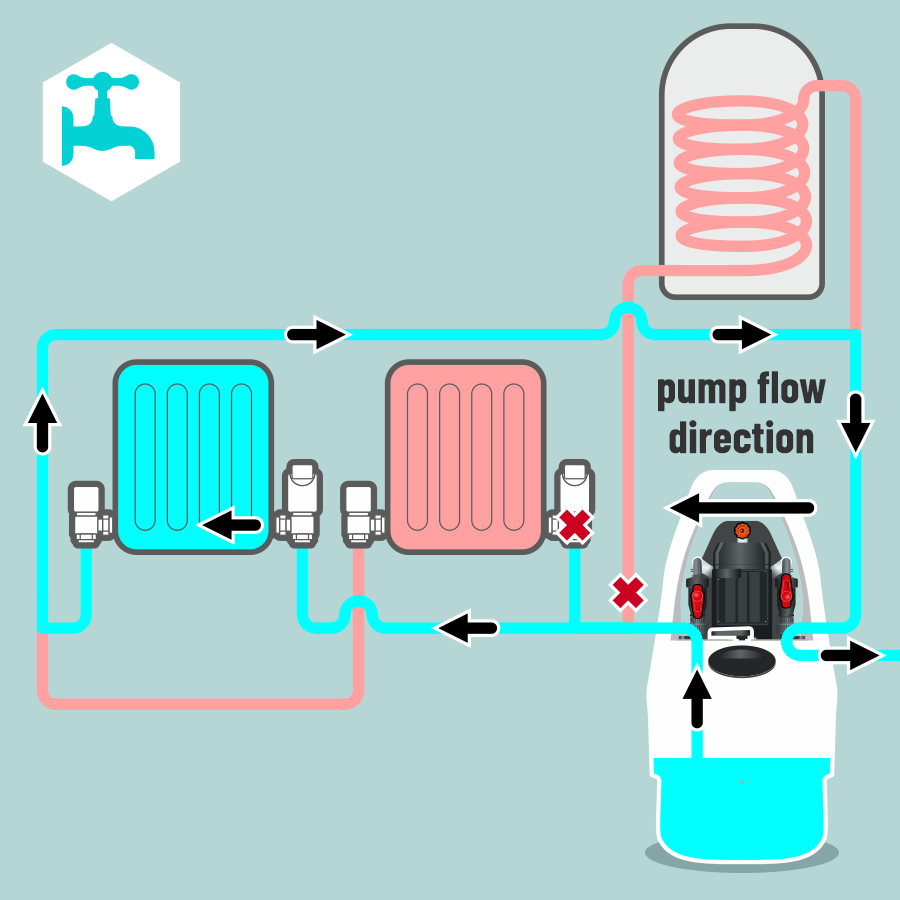
- Circulate FX2 through cylinder coil only*
- Reverse flow regularly *if cylinder is present
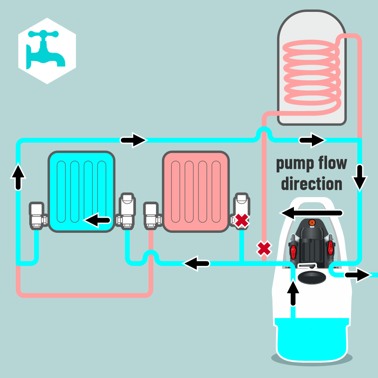
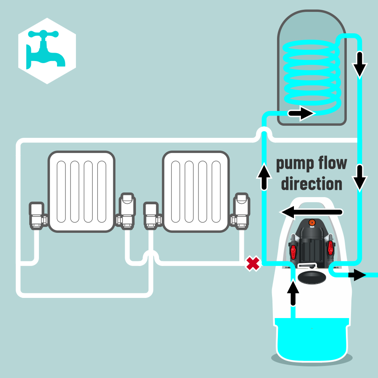
26 OPEN RADIATOR 1
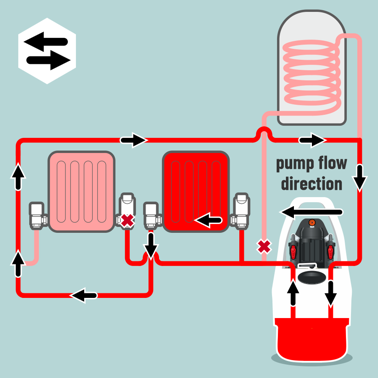
- Isolate cylinder
- Open radiator 1
- Circulate FX2 through radiator 1 only
- Reverse flow regularly
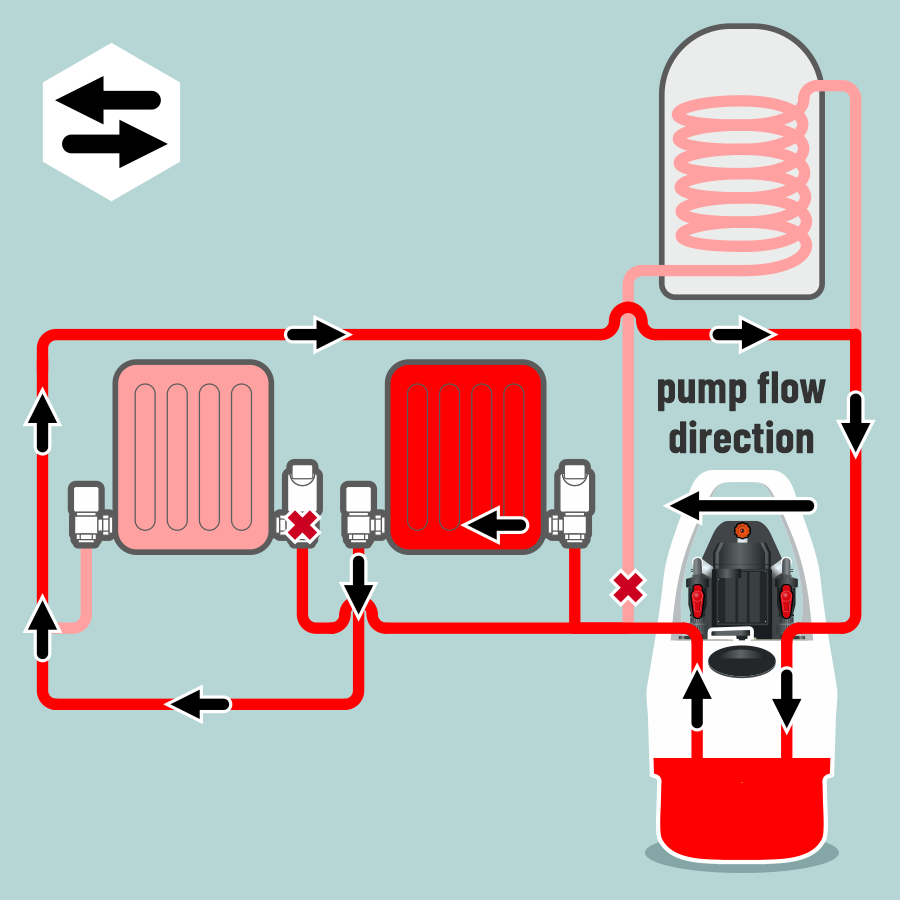
27 OPEN RADIATOR 2

- Close radiator 1
- Open radiator 2
- Circulate FX2 through radiator 2 only
- Reverse flow regularly
- Repeat this process with all the remaining radiators on the system
28 SET VALVES TO DUMP
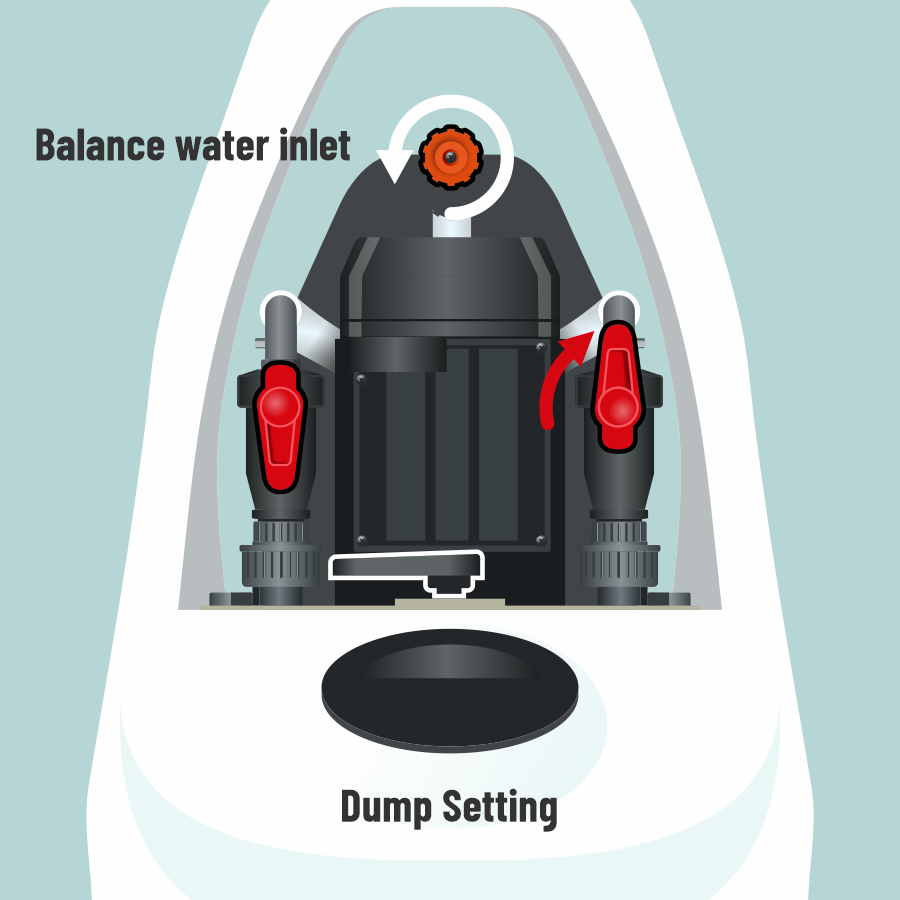
- Isolation valve to the opposite side of flow direction is set upwards to "dump"
- Water inlet valve is balanced to maintain water level in the holding tank
29 DUMP RADIATORS
- Dump radiators individually and in reverse order
- Dump until water runs clear
- Repeat step on all radiators on the system
30 DUMP CYLINDER
- If no cylinder is present, go to next step
31 SET VALVES TO CIRCULATE
- Ensure water inlet valve is closed
- Reset isolation valve to downward position
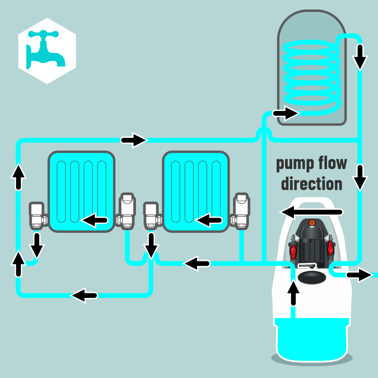
32 ADD NEUTRALISING CRYSTALS

- Open system
- Circulate neutralising crystals
- Reverse flow regularly
33 SET VALVES TO DUMP


- Isolation valve to the opposite side of flow direction is set upwards to "dump"
- Water inlet valve is balanced to maintain water level in the holding tank
34 DUMP NEUTRALISED WATER

- System is wide open
35 DUMP SYSTEM


- Dump until water runs clear
36 TEST DUMP WATER

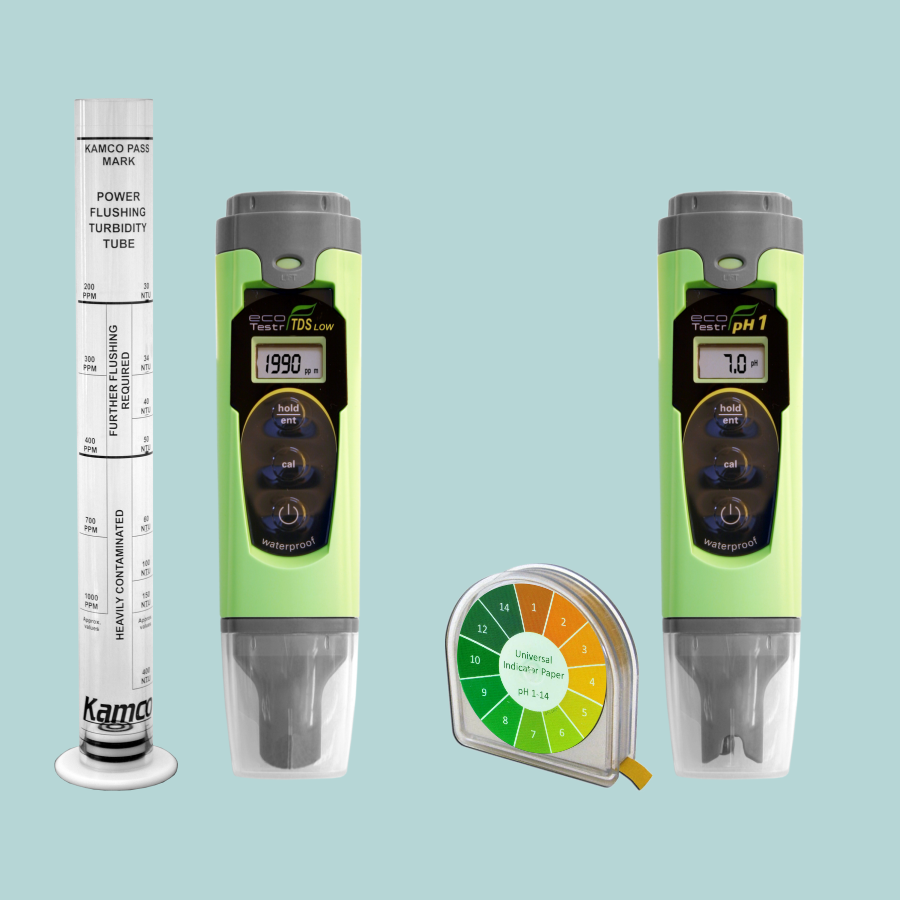
- When dumped water runs clear test it to be sure
- Test with Turbidity Tube and TDS Meter
- If Power Flush FX2 chemical has been used,then test with pH Paper or pH Meter as well.
37 TEST FOR CONTAMINANTS

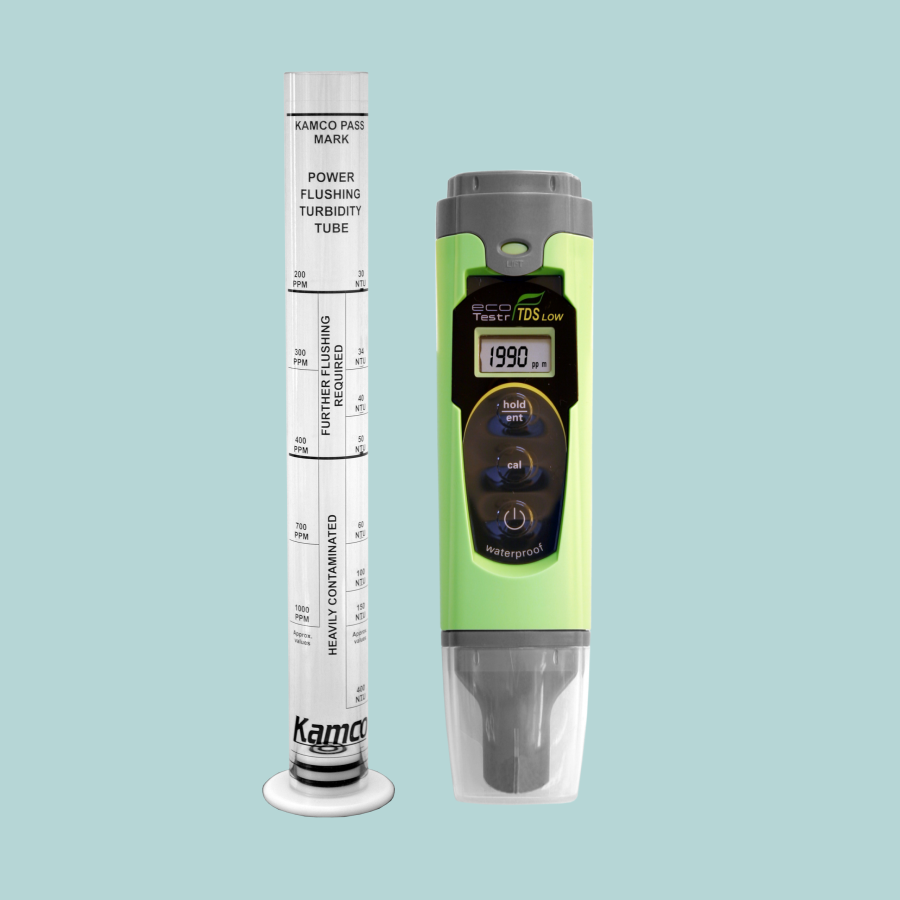
- Use a turbidity tube to ensure that no particulate or solid contaminants still present
- Use a TDS meter to ensure that no soluble contaminants are still present.
38 GET TO pH7 NEUTRAL


- Dumped water with a pH test of 7 is neutral
- Lower pH levels will lead to corrosion in the system
- Higher pH can damage aluminium if present
39 SET VALVES TO CIRCULATE


- Ensure water inlet valve is closed
- Reset isolation valve to downward position
40 SYSTEMSAFE DM

- For best results Kamco recommends using SYSTEMSAFE DM corrosion inhibitor with every power flush
- Complies with: BS7593 and
Building Regulations Part L
41 CIRCULATE SYSTEMSAFE DM

- Add SYSTEMSAFE DM to holding tank
via access cap - Circulate SYSTEMSAFE DM
- System is wide open
42 DISCONNECT AND DUMP
- Turn Clearflow power off
- Disconnect flow and return from system
- Run flow hose to foul water drain waste
- Turn on Clearflow power, dump holding tank via flow hose to foul water waste
43 RADIATOR HEAT DISTRIBUTION

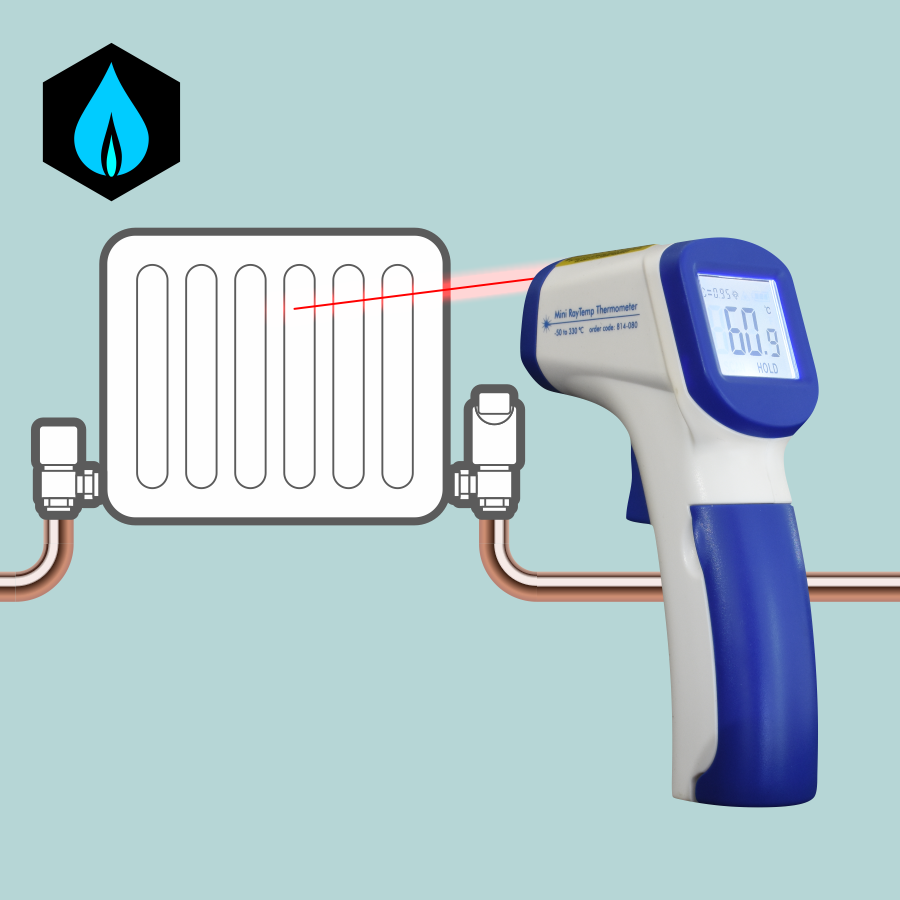
- Turn on boiler
- Use an Infrared Thermometer to demonstrate
more even heating of radiators with cold areas removed
44 LEAVE A RECORD
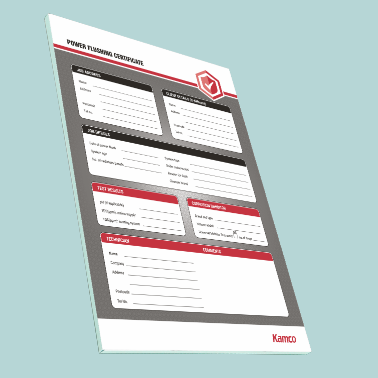

- Complete a Power Flushing Certificate to leave with the householder, retain the carbon copy for your records